Twin stick shooter
Overview
This will be quite a long blog post as I have a lot of things to talk about with images and videos.
Over the last couple months I have been working on quite a cool little prototype with numerous features added. I want to showcase what I have been working on while talking about certain parts of the development. I hope that you enjoy reading.
Here is a video to showcase the enemy AI, obstacle collision, object Y sorting, player movement & shooting and some of the artwork that I have created.
What it is
My goal with this prototype is to create a 2D twin stick shooter game while working on my pixel art drawing skills.
Player Feel
The thing that I wanted to focus on the most was how the player moved around, aimed at enemies and collided with objects in the world. It is important to have these systems working to a point where it feels good for the player to navigate in the game world. I wanted to create depth with objects while making the movement feel easy to navigate.
Creating Depth
How I got this working was quite simple actually. After testing various ways of handling how I want to handle depth between objects and characters I ended up with a very simple and easy to implement way of doing this. The first thing I needed to do was to make sure that my renderer was set to sort on the correct axes. I did this by changing the axes to sort on the Y axes. Since I am using a Universal Render Pipeline I had to find the Renderer 2D scriptable object and change the axes there. (This is located in the graphics settings I believe in the normal renderer pipeline).

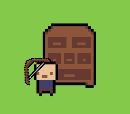
Then the next thing I did was by moving the pivot points on each object in the game as well as the characters. The pivot point is raised up a little from the bottom so that it is somewhere between the players hips or a little from the bottom of an object. In the pictures below you will see a little blue circle which is where the pivot point is on those objects.


After the pivot point has been set, it makes it easy to detect when the player is in front of a object or behind that object. The only thing left I had to add was a sorting group component to the player and choose the layer to sort with. I created a layer called World Objects to allow this sorting to happen. This has created more depth and immersion with the world objects as seen in the following images.


Artwork / Animations
Tool Used: Aseprite
The artwork was all drawn by myself so that I can work on a state system which changes the animations through code. I added a Idle, Dashing, and Moving animation/states for the player. I also created an Idle and Moving state for the Goblin and Slime enemies.


Ground Sprite Sheet Art
I wanted the testing world to feel a little more alive, so I decided to practice creating a sprite sheet for ground tiles. I tried to focus on a repetitive pattern for the brush that will be on the edges of the world, and some variation of grass tiles to be used as main grass and darker grass. I had a lot of fun getting this to work well when drawn in the editor and I am quite happy with the result.


Enemy AI
The last thing I worked on was the enemy AI. I gave the enemy two states, Idle and a chase. I made the enemy chase the player when they are within a certain radius and stop chasing when the player is no longer in that radius. The enemy will idle until the chase state has been triggered. I wanted to make this simple state machine so I can easily add and remove states if need be and it is a great start so far!